In our previous post, we’ve discussed the challenges of traditional window design; namely, that windows fail at some point and it’s important to design a window system that manages water between the window to wall interface.
Now, in our follow-up article, we’ll shed light on some simple techniques that can help you water-proof window openings on all your projects going forward.

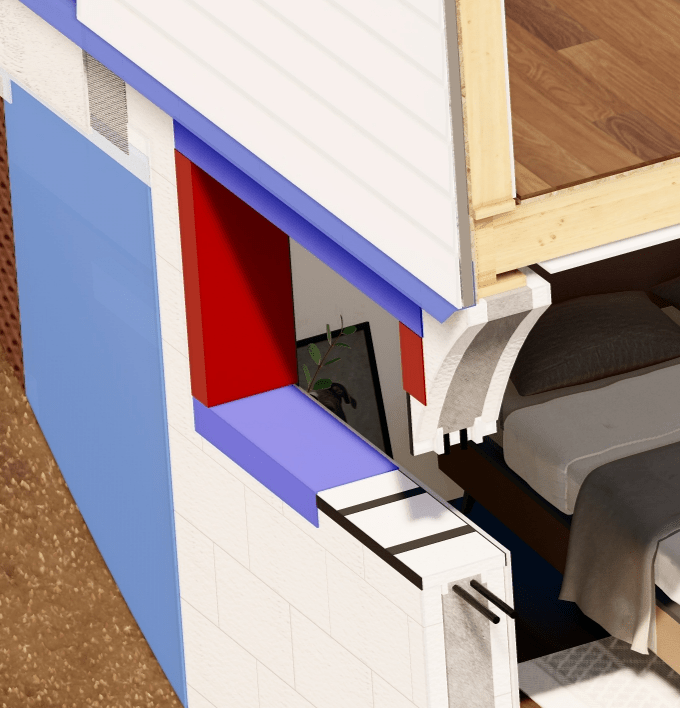
Logix Brands Window Details Halo® Exterra® and Logix ICF with Pro Buck
Previously, we explained why a face seal does not manage or offer protection from water between the window to wall interface.
While the configuration may work in low-rainfall areas, outside of these it’s not effective. The lack of an adequate protection of the rough opening leaves materials vulnerable to water damage. That’s why Logix Brands recommends installing a rainscreen detail for the rough opening of a window.
7 Steps to Installing a Rainscreen Detail at a Flanged Window
The 7 steps below outline the proper installation of a flanged window into a rough opening with Halo® Exterra® GPS Rigid Exterior Insulation (you can follow similar steps to install a boxed window).
The entire Halo Exterra installation guide can be accessed here.
Step 1 — Pan Flashing at the Sill
First, start off by cutting a section of Halo Exterra to match the size of the rough opening.
Next, install a self-adhering, or liquid-applied flashing membrane at the sill to function as the pan flashing.
The pan flashing should extend up the jamb of the window at least 8 inches, and over top of the wall assembly water control layer by a minimum of 2 inches.

Note that the sill for the rough opening should slope towards the exterior of the building enclosure. Alternatively, you can install a back dam.

Step 2 — Flashing at the Jamb
Install a self-adhering or liquid-applied flashing membrane along the length of the entire jamb.
If you choose to go with a self-adhering membrane, use a roller to ensure firm adhesion to the rough opening.
Step 3 — Window Installation
At this point, you’re ready to Install the flanged window and fasten it to the substrate. While doing so, ensure that the bottom flange is not fastened, and that you’ve provided shims to allow the formation of a drainage path at the bottom flange.
To achieve the best thermal performance for the entire wall assembly, install the window in line with the layer of continuous insulation.

If there is significant exterior insulation, use a window buck to support the weight of the window. You can construct the window buck from plywood sheathing that lines the rough window opening. In this scenario, you should cover the plywood sheathing completely with the self-adhering or liquid-applied membrane.

Step 4 — Membrane at the Jamb
Next, you’d install a self-adhering or liquid-applied membrane along the length of the entire jam, over the entire flange. The membrane should extend past the flange by a minimum of 2 inches onto the Exterra board.
Step 5 — Header Flashing Above Window
Now, it’s time to secure the metal header flashing above the window.
Once you’ve done so, you should apply a self-adhering or liquid-applied membrane over the top of the header flashing, extending at least 2 inches onto the Exterra panel. It’s critical not to seal the bottom flange to the Exterra — doing so would block water’s drainage path between the window-to-wall interface.

Step 6 — Install Furring Strips, Trim Boards, and Cladding
With the window opening properly flashed, you can install furring strips, cladding trim boards, and cladding around the window — as required.

Step 7 — Caulk the Window
Finally, you’ll have to air-seal the interior of the window. Although building codes accept spray foam as a compliant water and air seal on the interior of the window, we’ll strongly urge you to use flexible caulking and a backer rod instead.
Window Assemblies In ICF Walls
Windows installed in ICF walls with a window buck — such as Logix ICF with Pro Buck — should be flashed in a similar manner to the procedure we described above. You can use the images below as reference:


For the complete installation details of a window in an ICF wall assembly, please refer to Logix Insulated Concrete Forms CAD Detail Booklet Section 5.2.6. Window and Door Details.
Wrapping It Up
Installing windows with a rainscreen detail is a simple, straightforward way of preventing moisture ingress at the window-to-wall interface. In the post above, we’ve walked you through the 7 steps needed to create such a rainscreen assembly — you can use the same procedure when building with ICF walls and window bucks.
Tyler Simpson, MBSc.
Manager of Technical Services & Building Science (Canada) for Logix Brands
Tyler is passionate in the design of building enclosure systems that are durable, safe, efficient, and engage material selections that limit advancement of carbon emissions. His educational background provides a solid foundation of field research, hygrothermal modeling, and forensic investigation of building failures.


